
How to make a Subject Access Request (SAR) to obtain a copy of your Home Office records
We are all entitled to request what data and information the government has retained about us. If you are subject to immigration control and want to request a copy of the Home Office's files about you, you can make a Subject Access Request for free.
If you are challenging an immigration decision, it may also help to know what your Home Office records say.
the3million has prepared a step-by-step guide to help you make a Subject Access Request for your Home Office data. We recommend that you read our guide carefully before starting your application, as there are few details and documents which you will need to know and obtain before the application can be submitted and processed.
You can make a SAR directly by emailing: [email protected], or by sending a letter to:
Subject Access Request Unit (SARU)
2 Ruskin Square
Dingwall Road
Croydon
CR0 2WF
1. When you have read this guide and obtained the documents you will need, you can start by logging on to: https://www.gov.uk/government/publications/requests-for-personal-data-uk-visas-and-immigration/request-personal-information-held-by-uk-visas-and-immigration you will see this:

2. When you are ready and have your documents all to hand, click on the link to the online application form. Scroll down to the bottom and click the green ‘Apply Now’ button.
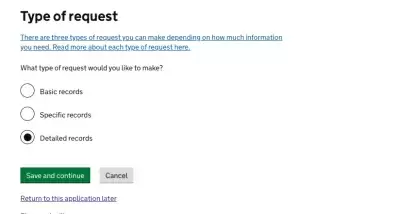
3. As a first step, you will need to specify what sort of subject access request you are making. We recommend you select the third type, which is for detailed records.
4. You will then be asked whether you want to obtain Home Office files (including Port records and Asylum Support records) or Detention Records. It is possible to select both options, which you may wish to do if you have spent any time in immigration detention.

5. You will be asked to explain the type of information you need and why. You can keep this quite vague and general and say “I wish to see all the files and case notes retained by the Home Office regarding my applications and time spent in the UK”. It may help if you specify what date you want the records from (eg your arrival date in the UK), and/or specify that you want the travel data held about you by the Home Office.
6. You will then be asked to register an email address and a password, and you will be sent a verification email before you can proceed any further.
7. When you have verified your email, you will need to specify whether the email you have used belongs to the applicant, an immigration advisor, or someone else. If you are applying on someone else’s behalf, select ‘someone else’, otherwise select ‘the applicant’.
8. You will then be asked if you are being represented by an immigration advisor. Since you are doing this request yourself, select No.
9. At this stage, you will be asked to confirm all the details you have entered so far, before then being asked to confirm your name and (once again!) whether you are represented.
10. You will be asked if you have used any other names, and you will then be asked to provide your phone number, and on a subsequent page, your address.
11. You will be asked to provide details of all nationalities which you hold, and your date and place of birth.
12. After being asked whether you have used any other dates of birth, you will be asked to specify what applications you have made to UKVI, the date and method of your first entry to the UK, and the names and dates of birth of your mother and father.
13. On the next page you will be asked to identify if you are vulnerable due to disability, age or illness, or if you are currently in immigration detention.
14. At the next stage, you will be required to provide as many immigration reference numbers as you can. You can see the list of options here:

15. With each box you select, a further drop down box will appear in which you can enter the relevant reference number. It may assist if you provide as many as possible if you have them. If you don’t have those reference numbers at all, or have them but can’t recall/don’t have them to hand, however, you can leave the relevant boxes unticked.
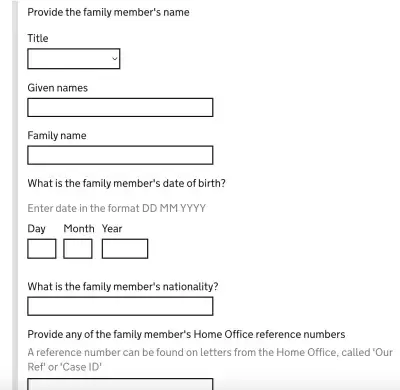
16. At the next stage, you will be asked if you have ever been included on a family member’s visa application (parent, spouse, or partner). If you select yes, the following drop down boxes will appear:
17. You will then be asked to double check all your answers.
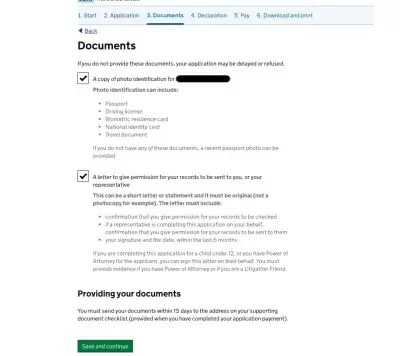
18. After submitting your SAR you have to complete the tasks that will appear on your application portal. You can send these documents to the email address: [email protected]. Or by post to the Subject Access Request Unit:
Subject Access Request Unit (SARU)
2 Ruskin Square Dingwall Road
Croydon CR0 2WF
19. If you are emailing the evidence to the SAR team we recommend using a subject line that includes your UKVI number and details that it is a submission of evidence. For your personal letter you can follow a simple template “I am writing to confirm that I give permission for UK Visas & Immigration to check and release all personal data requested. This letter serves as confirmation that I am the applicant, and I give full permission for the data to be release” with your signature. If you are supplying passports and you have a copy of any previously held passport you used to enter the UK these may be helpful for your request.
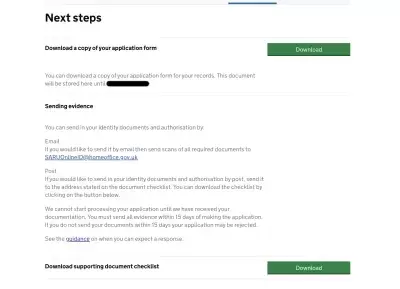
20. If you would prefer to send your documents by post, you can do so by clicking on the checklist, at which point you will see the address as set out in the image below. Please note that there is absolutely no requirement that you do this, and emailing a copy to the email address above is entirely sufficient.

21. If you have sent off your documents by email, you should receive an automated reply confirming receipt. The SAR Unit says that they aim to process all requests and provide copies of files within one month.
22. When you receive your file it will come in the form of an email attachment from [email protected]. We recommend that you regularly check your spam folder for emails from that address just in case it has been redirected to there.
23. If your file does not contain everything you need, you can email the SAR Unit directly at [email protected] to request further or outstanding records.
24. Equally, if you have any other questions about your application, or it is taking too long to process, you can also email [email protected], quoting the Unique Application Number (UAN) which you will find at the top of the downloaded checklist or copy of the application form.


